
Bike Mounting Like a Pro
Bike Technique, July 20, 2021
Effective bike mounting technique is optimal for quickly transitioning on to the bike leg. It also looks great when you nail it properly.
I remember sitting in the stands watching the Elite ITU Sprint Triathlon in Kinloch a few years back. As the lead women came out of the water, moved through transition and started getting on their bikes it was all business as usual.... until I saw one of our top athletes, Debbie Tanner come charging along the road, pushing her bike at full pace. As she reached the line she launched herself like a gymnast, was horizontal for what seemed like an eternity while her bike was moving forward, and she gracefully landed on her saddle, feet straight into her shoes and pedalled right up to the leaders. Behind her was a crowded melee of athletes scrambling to get out of transition, stopping to put a foot on their pedal, fumbling with their shoes, bumping into each other... it was a stark contrast to the speed and efficiency of Debbie's mounting technique. I don't even know the final result of the race, but the image of Debbie resonated with me and really hit home how important this skill is.
Watch any elite triathlon, you will see these athletes have this skill dialled. It's one of those things that can make our break your race, especially in a Draft Legal event where missing the bike group by a matter of seconds could define your race.
This is a skill I have always worked on myself, and there are a few key steps I take in place to make sure it's successful. I practice my mounting technique regularly, and make sure I can do it seamlessly. At least if I can't go fast these days, I can still make it look like I know what I'm doing.
Study the transition
Before the race you should walk transition. Get a feel for how far the run from your bike rack to the mount line will be. Look out for any obstacles along the way, or directly after it where you will be riding. Just because you may have raced the course before it doesn't necessarily mean the mount line will be in the same place. Do a couple of 'run-throughs' with your bike to decide if you have to change from one side of your bike to the other depending on where your rack location is. Don't be that athlete mounting their bike too early and having to dismount and start again, maybe even incurring a penalty.
Don't get crowded
I like to get away from the crowds of people mounting their bikes. There's too much risk of collision, and the road you are running on to may be narrow. I try to get through transition as quickly as possible, and if I am with a group, I want to be one of the first on my bike. If this means having to run through a group of athletes beyond the mount line just to get some clear space I would do it. A few extra metres of running is better than potentially crashing your bike into someone else.
Shoes on your pedals
This is a skill that's well worth learning. It's best done with a Triathlon specific cycle shoe where you aren't having to contend with too many velcro straps or ratchet buckles. If you can hang your shoes with rubber bands so they are horizontal to the ground, this will ensure they are level, open and ready for your feet to go straight into.
Hands on the hoods
Having your hands on your brake hoods mean you are in a strong stable and easy to manoeuvre position. Don't have your hands in the drops or on the tops as you aren't going to be as well balanced here.
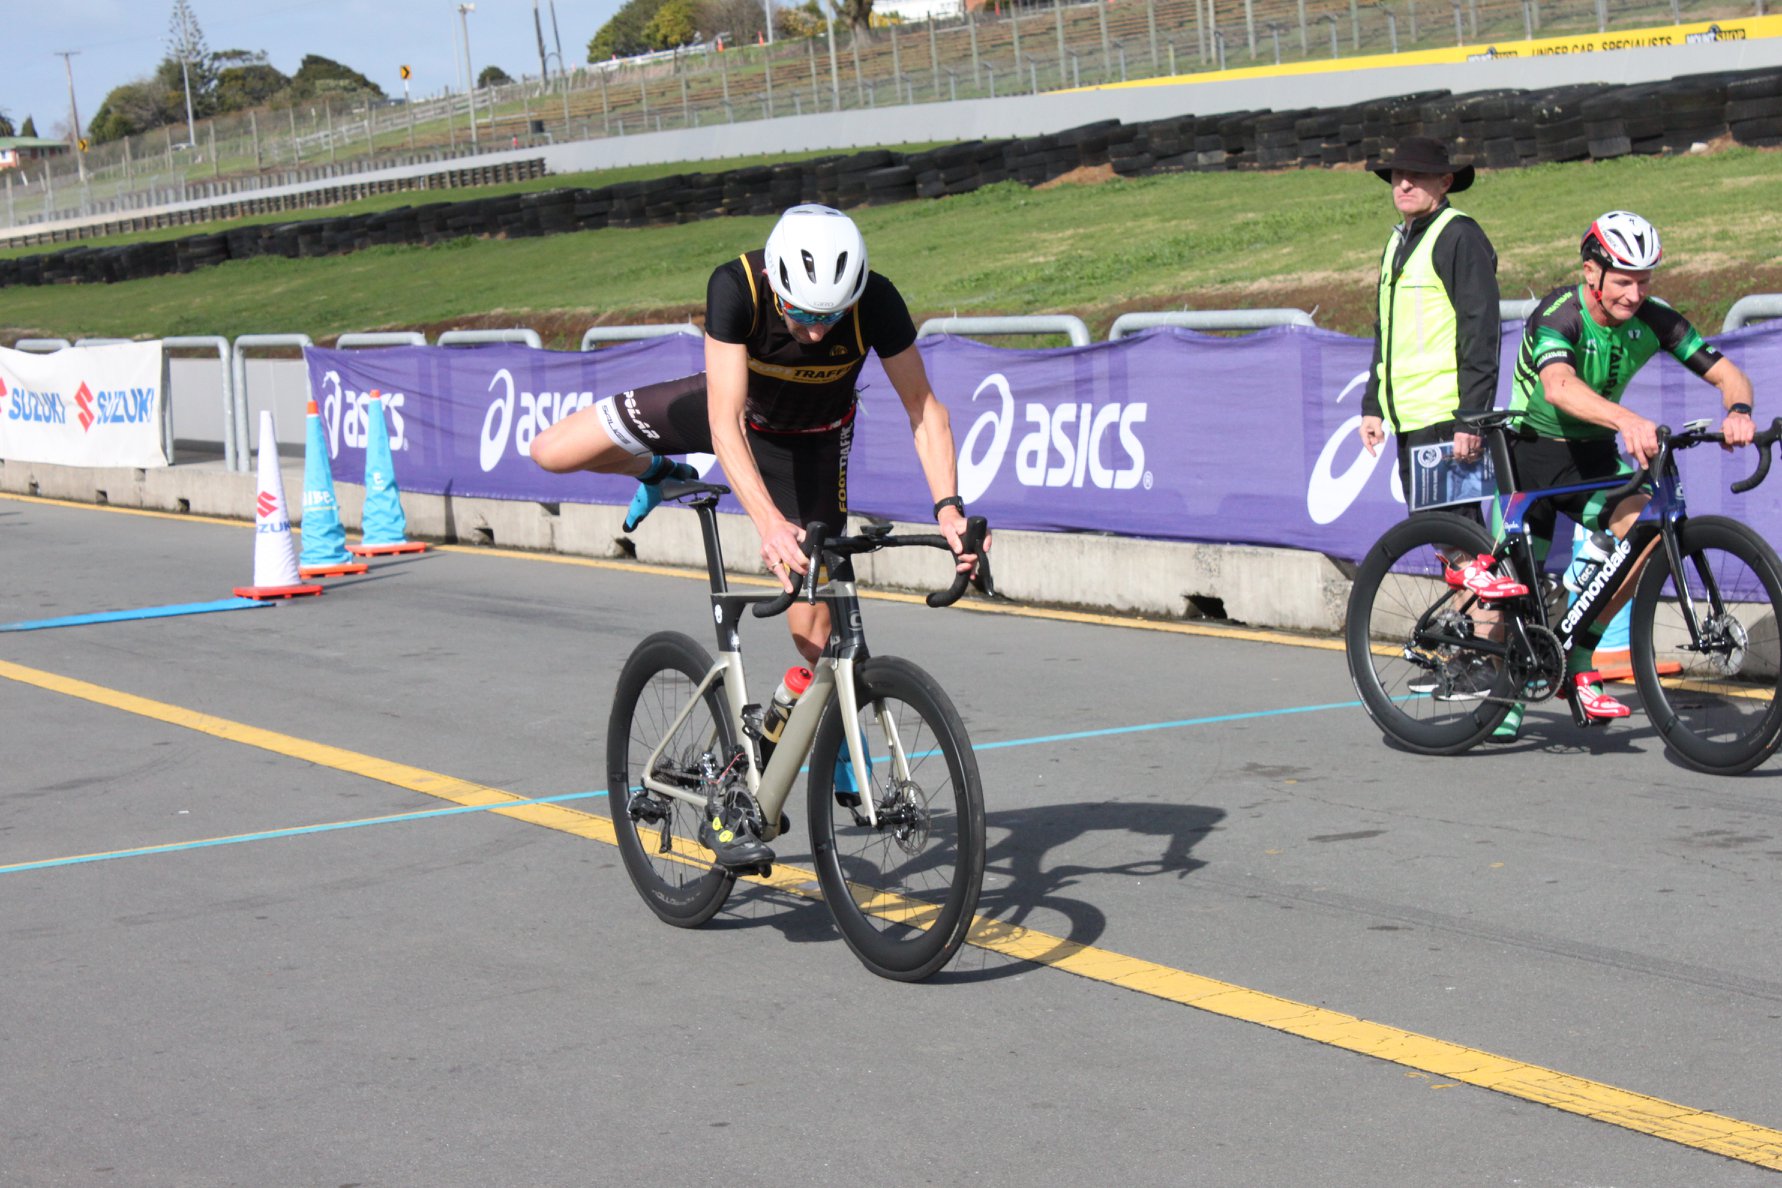
Foot on the shoe or flying mount?
There's two ways you can go about it. You can run along, pause for a very short time, put your foot on your shoe and then swing your leg over. Or you can do the Flying Mount where you hurdle your bike seat with your leg midway through a stride. The Flying Mount is slightly faster and looks cool, but it comes with greater risk. So try each method and see which one works better for you.
Gearing
Being in the right gear means as you take that first pedal stroke you will quickly engage the drivetrain and accelerate quickly. Check if you are going to be on a slight incline or flat road, and set the gear accordingly. You don't want to be too low a gear as your feet will move too fast, and being over-geared will have you stalling and not going anywhere.
Tighten your saddle
A few times I've done a flying mount I've landed on my saddle and it's dropped down a few mm just because the bolts weren't tight enough. Not ideal! So make sure you use a torque wrench to tighten your seat post and saddle pitch bolts so you can be confident of a trouble free mount.
Rear drink bottles
Some of you long course athletes might have 1 or 2 bottles off the back of your saddle. Depending on the height of these bottles you may have trouble clearing them as you swing your leg over. Nothing worse than kicking your bottle out of the cage and having to stop to pick it up.
Practice, Practice, Practice
As with any skill based activity you have to practice it regularly and make it a natural movement. So spend plenty of time working on it, in different situations, different locations and during hard training sessions. It's difficult enough doing it when you are fresh, but when you are out of breath from a hard swim or run immediately beforehand makes the mounting process even more difficult.